December 16, 2010

May Arts Plaid Ribbon Challenge - Enter to Win!

Want to win some free ribbon?  Follow this link: http://www.mayarts.com/blog/show-us-your-plaid-challenge-entries to see my complete entry (#10), along with all the others, for the recent May Arts Plaid Challenge. Enter a comment on the May Arts Blog with your favorite project (hopefully mine!) and you will be entered in their drawing.

As an added incentive, if I win, I will also be giving away some free ribbon so keep watching my blog to see what happens!

Thanks for your support!

December 10, 2010

Holiday Card

Looking for a little last-minute holiday inspiration?  This card is elegant yet simple.  A few quick score lines, a bit of sheer ribbon and a die-cut dove provides the backdrop for the season-appropriate verse.

The verse is embossed using Judikins gold detail embossing powder and the stamp is from Verses Rubber Stamps.

December 9, 2010

A gift for the holidays

Recently, I made some gifts for friends - a box of handmade monogrammed greeting cards.  Being in the holiday mood, I thought it would be fun to do a twist on the traditional cards and nestled the monogram circle in a "forest" of trees. 

I hope you are on schedule with your holiday plans.  If not, why not whip up a quick batch of notecards?  Some beautiful ribbon, holiday printed paper, a few die cuts and a quick stamped initial and you're ready to go.  Not sure who your recipient will be?  Replace the initial with an appropriate short greeting and you'll have a wonderful surprise at the ready in your gift closet.

The trees and circles are from Accucut; the ribbon is from May Arts and the monogram border and initial are from Just Rite Stamps.

Happy holiday crafting!

November 25, 2010

Happy Thanksgiving!!

I'm a big fan of Rosie's Roadshow stamps because they are small and very interactive.  You can easily combine the designs to create a custom look for your greeting cards.  The verse on the inside of this card??  "Don't let the turkey get you down."

I hope you have a wonderful Thanksgiving and thank each of you for visiting my blog.  And, I want to say a special "Thank You" to all who have attended my classes this year.  I appreciate your support and the creative spirit you share with me.

November 22, 2010

Cheaper by the Dozen Contest Winner

This fun birthday card was created by Kathy Walch and won the 3rd quarter CBD contest.  It's a spinner card and the little golf ball on the front rolls across the green by simply tilting the card.  The inside carries the golf them with a message of "Happy Birdie".

If you have attended one of the CBD classes this quarter, don't forget to submit your entry to me by January 1!

August 30, 2010

USAQ DT Challenge - Studio Cloth

Finally!  I must say that when I started this project I didn't anticipate just how long it would take so I do apologize to all of you and my DT mates for the very long delay in getting the last USAQ DT challenge project completed and posted.  But, I must say it was certainly worth it.  I just the love the results of this awesome tote bag!

While the project was not particularly difficult, I did have a few learnings along the way that I thought I'd share with you before I give you the step-by-step detail.

  • First, plan ahead - mostly for the drying time needed between steps and for each side.
  • Second, test your background colors against the napkin you plan to use.  I found that while my colors all coordinated beautifully, the thin top layer of the napkin was no match for the purple and green backdrop so I simply used my pigments to enhance the image.
  • Third, make sure you have enough of the materials you will need for the project - paint, PPA, etc.
  • Finally - have fun!
Now for the instructions:

Here's the flip side of my fun tote.  I hope you'll try this project and send me photos of your finished piece!

August 29, 2010

And the Winner Is . . .

At long last, I'm finally getting around to posting the winners from the 2nd quarter "Cheaper By The Dozen" card contest.  If you don't know what the contest is all about, you can find the details here.

The first place winner is . . Barb Voelkel.  Barb's card is a twist on the easel card we did in class.  What you can't tell from this photo is the amount of time Barb invested in making this card - she popped the butterflies and repeated the theme on the inside of the card and envelope.

And, for this contest we also had a 2nd place winner . . . Marlene Leugers.  Marlene's card is a twist on the card we made using a template cut from the Nestabilities scalloped rectangle.  Instead of sponging color inside the "frame" portion of the template, Marlene used the die cut shape and sponged color around it, leaving the center white.

Congratulations to Barb and Marlene and a big thanks to all who played along this quarter.

Don't forget, if you want to play along you need to attend one of this quarter's classes and submit your card(s) directly to me by October 1.

August 16, 2010

USAQ DT Challenge

This week's challenge involves Studio Cloth and Perfect Pigments.  Working with the products was not the real challenge for me but rather my schedule the past two weeks.  When I received my kit, I immediately knew what I wanted to do but had very little time to work on it.  I didn't want to miss the team post today so I'm only able to give you a sneak peek at the project.  Check back in a day or so and I'll have the project ready to show you in its entirety.  In the meantime, be sure to check the rest of the DT's blogs for lots more inspiration.

August 10, 2010

USAQ Blog Hop


It's a blog hop and everyone is invited!  USAQ is hosting a blog hop and you're invited!  Please check out all the details on the USAQ Blog but don't wait - the deadline for submissions is August 20th.  Time is running out so don't miss your chance to play along and be eligible to win some fabulous prizes.

Need a little inspiration from the master herself?  Sue will be in Cincinnati this week for Stampaway and will demoing USAQ products at Stamp Your Art Out on Wednesday and in the Marco Paper booth on Friday and Saturday at the Sharonville Convention Center.


August 5, 2010

Stampaway Friday Night Ticket For Sale

I have two tickets for the Friday night preview party at Stampaway for sale.  Cost is $38 each.  If you are interested in purchasing, please send an email to craftjunkies@gmail.com.  Tickets will be sold on a first come, first paid basis!

August 2, 2010

USAQ DT Challenge #4

 
Sometimes, beauty is found in the simplest things.

When I received my kit for the USArtQuest Design Team challenge #4, I found a tin full of fabulous colors, sizes and shapes of mica chips and flakes.  The way the little jars were packaged reminded me of the wide array of bling embellishments available today.  I decided to make a batch of my own and started with some chipboard, die cut a bunch of shapes and then just started playing with them. It is really quite simple to do - brush each piece with a coating of PPA gloss and randomly sprinkle or artfully place flakes on top.  Leaving them to dry overnight, I was quite pleased when I revisited my treasures the next morning.  

For my DT project card, I selected this butterfly and decided the best way to transform it into a thing of beauty was to make a simple yet elegant backdrop.  Taking my inspiration from the colors of the mica flakes, I opted for a grey, blue and turquoise palette.  A little scoring around the edges, highlighted with some lightly dusted turquoise ink gently complements the butterfly without drawing the focus away from it.  And, taking my cue from our last challenge which included handmade papers, I cut a "mat" from a pretty paper bag and mounted the entire piece to a soft blue grey square card.  Can you "shabby chic?" 

Be sure to check out the cool projects created by the rest of the USAQ DT (see links on the right).

July 19, 2010

USArtQuest DT Challenge #3

It is time for another USArtQuest Design Team challenge post.  For this challenge, the DT received some mica tiles, PPA gloss and some beautiful handmade papers.  The papers reminded me of some gorgeous woven silk fabrics I purchased while in Hong Kong and Gurgaon, which made me think of fashion and this page from a vintage Sears catalog I had patiently waiting in my craft stash for just the right project.

The base of this card is black linen cardstock matted to ivory linen cardstock.  A few carefully torn pieces from my vintage catalog page were adhered with PPA matte; accompanied by some lace trim, aged with a bit of walnut ink.  For the finishing touches, I used heart shapes punched from mica to spotlight the model's face, the price and a deep red silk flower to bring a touch of color to the collaged card. 

If you haven't played with Mica tiles in a while, hopefully this will inspire you to dust them off and get creative.  Be sure to check out the awesome projects created by the rest of the team at the USAQ blog.


July 6, 2010

Box of Chocolates


Remember the line from Forrest Gump - ". . . life is like a box of chocolates . . . "?  Well, that's what I think of whenever I look at this card.  Verses Rubber Stamps has come out with some fabulous new designs and this card features one of them so be sure to check them out online or in person at Stamp Your Art Out.

I made the background paper with a quick swirl of chocolate brown acrylic paint and pink shimmer mist.  The little gold "faux" brads were made using Duo Glue and Gilden Glitz flakes from USArtQuest.  And the cardstock is my favorite KaleidaPaper from Marco's Paper.  And the best part?  The embellishment is a gold foil-wrapped chocolate!  Add this to a tin of your favorite homemade or store bought chocolates and you've got the perfect girlfriend gift for any occasion.

July 5, 2010

Happy Birthday Mom!

Today is my mother's birthday and she is quite the firecracker.  She loves to dance and strut her stuff so I decided the peacock (from Magenta) was the ideal image for this year's birthday card.  I stamped and embossed the image in gold (Judikins) on watercolor cardstock (Marco's Paper) and then painted it with watercolor paints (USArtQuest).  I matted the finished image with two colors of Stardream cardstock (Marco's Paper). 


Lately, mom's been a bit frustrated because she's "off the grid" and everything she wants to do seems to require internet access and/or an email address.  My siblings and I decided to help her get connected and we bought her a laptop.  To say she was surprised is an understatement.

It isn't often we can pull one over on my mother but with a little planning and some fancy footwork, we managed to really get her good this time.  We started her off slow - teaching her how to play solitaire and do some basic stuff in Word.  We're working on getting her on email and maybe even Skype so she can virtually visit her out of town family and friends.  Oh, the possibilities are endless and, while she admits to feeling a bit overwhelmed, she is really excited to be learning all kinds of new things.

If you're interested, you can leave her a quick birthday message via a comment on my blog because, of course, I know it will be one of the first places she'll want to visit wants she begins surfing the net!


Happy birthday, mom!

July 4, 2010

Pink Flamingo

It's time for another USArtQuest Design Team project!  Before we begin, however, I want to say a big THANK YOU to everyone who visited our blogs for the inaugural blog hop and giveaway.  The winner of the Draw and Gild kit was Karen Denson - Congratulations, Karen!


Now, on to the current project.  The DT received the goodies for the napkin collage technique and, once again, we each had our own way of transforming them into unique works of art.  Want to see what the other DT members have created?  Check out their blogs:


The inspiration for my project came from one of those purchases we've all made.  You know - the fun item in the clearance section of our favorite store that we just have to have it because we're certain it will be ideal for some unknown future project.  I found these fun pink flamingo napkins last summer and today I am finally vindicated! 

If you want to make your own version, just follow these easy instructions.  Brush a quick coat of PPA matte on the art canvas and gently apply the printed layer only of the napkin, centering the flamingo.  Let it dry and then trim around the design, leaving about 1/2" to wrap around the back of the art canvas, adhering the edges to the back with PPA matte.  To finish the focal piece, I used my fine liner tool and some gold watercolor paint to highlight parts of the flamingo and then gave it a top coat of PPA gloss, with a little sprinkle of Crystal Effectz.

With my flamingo complete, I just needed to create the perfect tropical setting.  With a few quick strokes of interference watercolors, I created some palm fronds and rippling water and my card was complete.

Thanks for stopping by my blog and happy summer!

Connie


June 20, 2010

USArtQuest Blog Hop and Project

Welcome to the inaugural blog hop for the new USAQ Design Team!  We've been busy creating cool projects using the Draw and Gild kit.  In addition to hopping from one DT blog to the other to see the fabulous creations, you can enter to win one of the Draw and Gild kits so you can see for yourself what all the excitement is about.

There are some rules, of course, to be eligible to win.  You must stop by the blog of each DT member and enter a comment on each blog before 11:59 P.M. ET on June 27, 2010.

To make it even easier for you, I've listed all of the blogs below so you can simply click on the DT member's name and you'll be taken to her blog.  Oh, and one more thing, you need to hop in order starting with Sarah's blog!


Before you go, however, don't forget to check out the awesome frame I made for the hop.  Most of you know I'm a cardmaker at heart but this is a special event so it calls for a special project.

I did get a bit carried away working on this project and couldn't seem to restrict myself to just using the supplies in the kit.  The quality of the USAQ products is phenomenal!

With the exception of the frame, all supplies can be purchase at USAQ's online store.


Gildenglitz - gold
Fine Liner tool
Duo Glue
Paint brush
Perfect Pigments - titanium white, deep sky blue, cobalt turquoise hue, magenta, purple mist
Perfect Glaze - clear
Perfect Paper Adhesive Gloss
Crystal Effectz
Wood frame

Paint the frame with a base coat of white.  Mix glazing medium into the blue, turquoise and purple acrylics.  Using the little yellow sponges that come with the acrylic paint kits, layer the paints starting with the turquoise and adding highlights with the blue and purple.  Remember to let a little of the white base show through.

When the paint is dry, place a couple of drops of Duo Glue into the Fine Liner and let your imagination (and your hand) wander, creating swirls and squiggles all over the frame.  Remember, when the Duo Glue is clear, it is ready to adhere.  This is your sign to add the Gildenglitz, pressing the flakes gently into the glue.  Use the texture sponge to brush off the excess flakes, which can be used in the next step.  To add a little interest, I placed a drop of Duo Glue on my finger and created a few smudges here and there, adding more Gildenglitz to bring them to life.

For the finishing touch to my frame, I coated the frame with PPA gloss and lightly sprinkled a bit of Crystal Effectz.

I typed up one of my favorite prayers and inserted into the frame.  Not only am I reminded of the message, but seeing it in the beautiful frame puts a smile on my face. 

Now, get hopping and good luck on the drawing!

Connie

P.S.  If you don't win or just can't wait, you can always purchase your own kit!  You won't be disappointed.

May 28, 2010

Big Announcement


It's time for the big announcement - drum roll, please . . . . USArtQuest has formed a new design team and I am very excited and honored to have been chosen to be a member.  Other members of the team include Jan Hennings, Jessica Griffin, Julie Ranae, Lea Cioci, Sarah Anderson, Suzi Blu, and Terri Sproul.  Check out their fabulous blogs (links located on the right).

I had the pleasure of spending time with Susan Pickering Rothamel at her store and studio last year to learn all about the fabulous, artist-grade products offered by USArtQuest.  If you've taken any of my classes, you know how much I love this line.  Feel free to leave a comment and tell me what you think about the USAQ line.  Don't know what I'm talking about?   Well, hop on over to the USAQ website and check them out.  You'll also find some great how-to videos featuring several of the products.

Stay tuned for more news and happenings in the upcoming weeks!  This would be a good time to become a follower of my blog and to sign up for automatic email notifications so you don't miss out on any of the buzz!

Thanks for visiting.

May 26, 2010

Big News!!!

I have some very exciting news to share with you - I've been published again in the July issue of CardMaker Magazine.  My article is all about reverse stamping  and includes three cards, each using a different technique.

But wait -there's more!  I am about to embark on another aspect of my creative journey and I'm not going to do it alone.  Want to know why I'm all smiles and about to burst at the seams????  Well, I can't tell you just yet - you'll have to check back in a couple of days to find out all the details on this one!

In the meantime, I thought I'd share a quick card that is appropriate for the upcoming holiday weekend - the unofficial start to summer - yippee!  This cute little chef is from Inky Antics and the inside contains the verse "my condiments to the chef" - also from Inky Antics.  Wouldn't this make an adorable thank you card to send to your host/hostess for this weekend's barbecue or picnic?

I colored this with my Prismacolor pencils and Gamsol.


May 2, 2010

CBD Card Contest Winners

Our first quarter card contest from my Cheaper By The Dozen class is over and the results are in.  We actually had a tie for first place so I asked my craft sister, Peggy, to cast the tie breaker vote to keep the judging as unbiased as possible.  Although the contest is set up to only have one winner per contest, I decided to do a first and second place this time.

And the 1st place winner is . . . . Barb Voelkel!  Barb submitted a twist on the "cocoa monkey" pocket card.  Using some printed paper, an embossed and popped coffee mug and a palette of soft greens, shades of taupe and accents of black, Barb created a winning card.  On the inside of the card, she layered the scalloped pocket and repeated the circles punched from the printed paper.  Tucked inside the pocket was a packet of cocoa and a coffee stirrer - a greeting card and a gift all in one.

Our 2nd place winner is the fun-loving team of Bonnie Brill and Jan Heller.  Their card was also a twist on the "cocoa monkey" pocket card.  Bonnie and Jan used a completely different color palette - purples, pinks and greens and included a packet of seeds in their Mother's Day version.  What a clever idea!

Thanks to all who submitted cards and to all my fabulous "Cheaper Chicks" for voting.  Don't forget that entries for the 2nd quarter contest are due to me by July 1.  Click here for all the contest rules.  Check the class list on the right for future dates of CBD classes.

Congratulations to Barb, Bonnie and Jan!


May 1, 2010

Alex the Patriotic Pup

With Mother's Day just around the corner, I decided to spotlight one of my "kids" for the MiTi at Marco's Paper yesterday.  I turned an easel card into a photo frame easel card by simply layering a piece of acetate over a decorated piece of cardstock.  By using brads to hold the acetate in place, you can easily change the photo by simply sliding it under the acetate.

We used the watercolor palettes and the fine liner tool from USArtQuest to make the card.

If you weren't able to join us yesterday, check back in the next day or so and I'll post my usual step-by-step instructions.

Happy Saturday!


April 17, 2010

Fallen off the face of the earth . . .

Just in case you were wondering, I haven't fallen off the face of the earth (yet).  I have been a bit busy lately and that is likely to continue for awhile so my posts will continue to be a bit sporadic.

I normally don't post cards from my classes but I thought this card (from a recent Cheaper by the Dozen class) was quite appropriate for today's post.  I will be at the Adventures in Stamping convention in Akron this weekend, doing lots of demos in the Marco's booth.  This card combines two of the demo topics - coloring with Copics and embossing with the new electric Sizzix machine.  I'll also have the new stamp positioner from Scor-It and the new distressing tool from Zutter so be sure to stop and say hi!  The flower stamp is from Magenta.

If you can't make it to the convention but live in the Dayton area, I'll be doing a free Make-it/Take-it at Marco's on Friday afternoon (04.30) as part of their Spring Spectacular.  You can check out all the cool happenings on Marco's website - scroll down to the week of April 25th.


March 10, 2010

Going Green for St. Patrick's Day

Are you ready for St. Patrick's Day? I actually made this card the first year I started stamping.  As you can see, I had so much fun with the card that I just kept going and made a matching green envelope with a hand-stamped liner paper.   Over the years, decorating envelopes has become my unofficial trademark.  And, why not?  You've already got the supplies ready to go so add a stamped image, a dusting of color and a little surprise inside . . .


February 28, 2010

Make-it / Take-it at Marco's Paper


Yesterday, I had the pleasure of hosting the Make-it / Take-it at Marco's Paper in Centerville.  We had several ladies join us to make this fun card, despite the cold weather and snowy roads left over from Friday night.

If you weren't able to join us, I've posted the supplies and steps for making the card below.
Supplies (all are available from the fine folks at Marco's Paper)

o 5-1/2” x 8-1/2” Carnival Cover cardstock – 80# pine
o 4” x 5-1/4” and 1-1/2” x 3-3/8” Cougar cardstock – 80# white
o 2-1/4” x 6” Kaleida Paper cardstock – 80# pink
o “Little More” rubber stamp by Rubber Cottage (RC-436D)
o Spellbinders Nestabilities – Long classic scallop rectangles (S4-145)
o Spellbinders Impressabilities – Pebbles (I2-1010)
o 10” of sheer pink ribbon
o Distress dye ink pads – Peeled Paint, Worn Lipstick, Scattered Straw
o Flower Soft – Sweet Pea or Spring
o Foam tape or pop dots
o Swirl punch from EK Success (PSM87C)
o Sponges


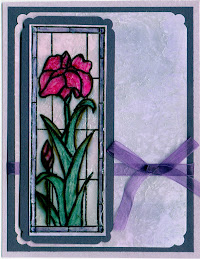
Emboss white cardstock with “Pebbles” Impressabilities plate. Arrange embossing plate so that it is on the raised design side of the cardstock. Sponge entire piece with pink, yellow and green inks. Remove embossing plate.

Wrap ribbon around front of embossed panel and secure on back side with tape, trim off excess ribbon (save for later use on card front). Adhere embossed panel to front of card.


Cut scalloped rectangle and punch (2) swirls from pink cardstock. Stamp verse on white panel with green ink; edge piece with green ink and adhere to pink scalloped rectangle. Adhere panel to card front over ribbon using foam tape. With excess ribbon, loop around ribbon on card front and tie a knot on the right side of the card.


Adhere one swirl at top edge of verse panel with foam tape. Adhere second swirl on top of first swirl, offsetting the image to create a flower. Place a dot of glue in the center of the flower and add a small bunch of Flower Soft for the center.

We used the Wizard machine but the Impressabilities and Nestabilities will work with other die cut/embossing machines.  If you're having trouble getting a good impression, try spritzing your cardstock with Paper Glide first.

Check your calendar for Saturday, March 6th - I'll be hosting another Make-it / Take-it at Marco's.  Check back later in the week for a sneak peek . . .


February 16, 2010

Sketch 6 - Card #10

What a perfect card to end this very long series of posts - with an umbrella in my drink . . . now I just need the sun and sand to make my day complete.  For this final version, I replaced the printed paper strips with some lime green raffia tied in a knot and the verse is matted on a tag for the focal point.  Ah, finishing a project feels good and provides a sense of accomplishment.

So, now I have to ask the question that has been lingering on my mind since I started this series - have you finished all of your cards from the class?  If so, send some to me so I can share with others.

I did some purging in one of my closets over the weekend and found several unfinished knitting, crocheting and sewing projects.  I was reminded of a comment I overheard at my favorite yarn shop - KnitWits - the other day.  The gist of it was a challenge to finish at least one open project before starting any more new ones or to pick a day of the week and dedicate it to working on unfinished projects.  So, tonight I'm headed to the nest to finish up an afghan that only needs about 2 more rows.  The intended recipient has long since outgrown it (it was originally intended to be a baby afghan) and so it will be donated to a worthy cause.  Another completed project, the wonderful feeling of accomplishment and the happiness in the eyes of the recipient - its all good.  I hope your day is too.


February 15, 2010

Sketch 6 - Card #9

One more to go after this and then I'll have to find a new topic to blog about.  The butterfly is an Accucut die and I used string pearls for the antennae.  This particular version is a great way to use up all of those scraps of paper and cardstock in your stash.

Enjoy!

February 14, 2010

Sketch 6 - Card 8

It's tax time and while I'm waiting for a friend to arrive so I can help her with her filing, I thought I'd take a minute for a quick posting.  Only two more cards to go and I'll be done with all of the posting from the Versatility class.  Boy, has this been a long process.  Thanks so much for hanging in there.

This card uses a fun musical note punch from Punch Bunch, a few more notes stamped on the card front and a couple of strips of printed paper that has a musical score on it with pretty colors sponged all over. I can't remember which company made the note and the verse, but I'll edit the post if I find them.

January 18, 2010

Stencil Class - Clarification


Yesterday, I taught a class at Stamp Your Art Out using brass stencils and various techniques.  This card was one of the samples I displayed for inspiration.  I mentioned that this card was done with tacky paper and glitter.  Upon further inspection, I realized that this card was made using translucent embossing paste, not tacky paper.

My apologies for giving you incorrect information. 


Sketch 6 - Card #7


It should be obvious by now that I love punches and dies.  Having a variety of shapes in lots of colors makes it easy to put the finishing touches on any card.  I've said it before but I think it bears repeating - if you are color or shape challenged, find a piece of printed paper that you really like and take your color cues from it.  Then, mimic or complement the main image from the design in your other card elements.  I used the ivory, pink and sage green from the printed paper to choose colors for my card, the flower, circles and even the brad.  Since the paper was a floral and leaf design, I chose a flower punch for my central image.  It all works nicely together and without a lot of effort.

Try this approach on your next project and be sure to let me know how it works for you!

January 17, 2010

Sketch 6 - Card #6


In January's edition of "Cheaper by the Dozen", our them was "Chase Away the Winter Blues".  One of the cards was designed to send along a tea bag as part of a get well card; another included a packet of hot chocolate to warm and cheer up a friend on a cold winter's day and another included a bookmark because who wouldn't want to stay curled up in your pajamas with a good book on a blustery day?  The cards were a big hit with the students and I received lots of positive comments on them.  The most common sentiment was that it was nice to have cards that contained more than just a greeting.  We talked about several variations for those cards - with a little change in color and design they could easily become a holder for a gift card, a photo, etc.  The bookmark and photo corner are both from Accucut dies.  The verse stamp is from Penny Black.

So, I thought it was quite timely that this card be posted from the "Cards with Versatility" class.  Use a photo corner as a pocket to tuck something special into your next card.

Not familiar with the Cheaper by the Dozen class?  Each month, I pick a theme and design four cards to fit it.  One card is always a Christmas/winter card but the other 3 designs vary from get well, thinking of you, happy birthday, etc.  Students make 3 of each design so they have a total of 12 cards from each class, including envelopes.  Check out my class schedule to the right and see what you're missing! 

January 16, 2010

Sketch 6 - Card #5


I love to look at my craft supplies and figure out different ways to use them.  For this card, I took 2 die cut borders (Accucut) and turned the cut edges toward each other to make a center design.  I put a piece of colored cardstock behind the openings to enhance it.  Next I used raffia for the stem of the flower.  A few punched ovals (Marvy), a silk flower and acrylic bead center and this card is ready to send off to cheer up a friend on a gloomy winter day - or to wish my sister, Victoria, a happy birthday since today is her birthday.  Happy Birthday, sis!

What different uses have you come up with for your crafting projects?  Feel free to share your ideas by leaving a comment on this post.


January 15, 2010

Sketch 6 - Card #4


They just don't get any easier than this!  For those of you who attended the "Cards with Versatility" class, you may remember one of the tenets was to have various elements on hand to quickly create cards.  Using a pre-printed card, I grabbed a die cut tag (Sizzix) and stamped a flourish (Hero Arts) and verse (unknown) in matching ink and then wrapped it with a die cut flourish (Accucut) from my stash.  A quick loop of ribbon and it was all done - in less than 5 minutes.  Actually, it took longer to create the idea and gather the supplies than it did to make the card!

I hope you're making good use of your cards to go box!  Don't have one?  They are easy to create - just grab a photo storage box and fill it with pre-stamped verses, throw in some die cuts (make extras when you're working on a project) and a few pre-formed cards and you're ready to go!

January 14, 2010

Cheaper by the Dozen Contest

Note:  This post has been revised to clarify a few of the challenge rules.

This post is for all of my Cheaper by the Dozen ("CBD") students.  At my January classes, I announced our new "Perfect Attendance" program - attend 3 classes (or buy the kit from the class) and you'll receive a free card kit (makes 3 cards) from a previous CBD class.  I also announced a CBD challenge at the Monday class but apologize to my Saturday students as I forgot to mention it to you.

The CBD challenge works like this:
  • The challenge runs quarterly and card entries are due as follows:

    • 1st quarter - due April 1
    • 2nd quarter - due July 1
    • 3rd quarter - due Oct 1
    • 4th quarter - due Jan 1

  • Card entries are to be a variation of a card design from that quarter's classes
  • Students can enter as many times as they want but must attend at least one class during the quarter
  • Winners will be chosen via secret ballot from votes cast by students attending the classes following the entry deadline (e.g., 1st quarter entries will be judged by April CBD attendees)
  • Entrants may not vote for their own cards and I will not be voting
  • Winners agree to let me post their winning entries on my blog but I will return the cards to them
  • Prizes will be awarded for 1st, 2nd and 3rd place each quarter with a grand prize given at the end of the year for the overall winning entry
  • Card entries can either be hand delivered to me during a CBD class or mailed to me in care of Coral Moon LLC at P. O. Box 62748, Cincinnati, OH  45262-0748.  Please do not leave your cards with a staff member of SYAO.
  • Entrants may submit as many cards as they wish to but will be limited to one quarterly first prize per calendar year
The card above is from a previous CBD class using stamps from Stampscapes and Cornish Heritage Farms and some fun techniques.  Haven't yet attended a CBD class?  Check out the schedule to the right and sign up for February's class.  Our theme will be "I've Got You Pegged" and it promises to be informative and entertaining!

Sketch 6 - Card #3


Well, I apparently got carried away with taking time off over the holidays and I am now quite delinquent in finishing up the Sketch 6 series.  I really didn't get time off - I had several sewing jobs that needed to be finished for customers for the Christmas holidays.  I am happy to report that they were completed on time and now I'm catching up on my blog posts.

If you've been playing along with this series, you know that I created lots of cards for the "Cards with Versatility" class from last year's Stampaway class.  At some point in the process, I got a little slap happy and started playing with fun and funky colors.  This card is the result of one such moment.

The verse comes from Verses Rubber Stamps.  The brackets and scallop border are from Accucut dies.  I love combining die cuts, pretty papers in bright colors and fun verses for quick cards that I can use for most any occasion.

Check back tomorrow for the next card in this series. . .