September 30, 2009

Sketch 2 - Card #6


My friend and I just came back from a day of knitting at our local yarn shop.  We're working on a very cool wrap that can be buttoned in the back and made to look like a vest. 

Now that the weather is getting cooler and I'm back into knitting, this card is quite perfect for today, with the little bit of fuzzy fiber at the top for interest. The card itself was die cut using an Accucut die.  The front was then embossed with a Cuttlebug folder that had been inked prior to embossing.  I also used a marbled paper to give it added interest.  The hearts were made using the Marvy "giga" punches.  The verse is from Rosie's Roadshow.

Don't forget to post your winning entry for the Sketch 2 challenge - only a few more cards to post before the deadline is here!

September 29, 2009

Sketch 2 - Card #5


As you can see from this card, the creative juices were really working the day this card was designed.  An embossed background (Cuttlebug), a few die cut shapes (Accucut), a touch of Pearl Ex (Jacquard) and a few pearls for the body of the butterfly make a great card in an elegant color scheme of eggplant, black and gold.  I used glossy black card stock for the scalloped square to add an extra special touch.

If you don't have matching striped paper for your project, make your own using a sponge dauber and your favorite ink pads.  Using strips of Eclipse masking paper (Judikins) makes it easy to get perfect stripes every time.

Now, let's see how your creative juices are flowing today.  Join in the challenge for this sketch (details can be found here).

September 28, 2009

Sketch 2 - Card #4


Well, it's Monday morning and  time for another Sketch post.  This is another quick version - printed paper, a few ovals and a silk flower with a skittle center.  The skittle was custom colored to match using Copic ink.

 If you want to play along with the sketch challenges, simply click  here to go to the post with all of the details.


And, shame on me for not posting the winner of the first sketch challenge - Peggy, from Cincinnati.  Congratulations to Peggy!  You can see her winning entry by hopping over to her blog.


September 27, 2009

Copic Color Charts

Since the caps on Copic markers don't accurately reflect the color of the ink, I decided to create my own color charts for easy reference when selecting colors.  The first chart is for Ciao and Spica marker colors and the second chart is for the Sketch colors (all 334 of them!).

To print the chart, simply right click on the image, select "open link in a new window" and the select print from your toolbar.

I suggest printing the chart with a laser printer on the card stock you use when coloring with Copics.  This give you a true sense of the colors.  I printed mine on both Solar White and Natural White Neenah Classic Crest 80# cardstock - my "go to" cardstock for Copics.


Sketch 2 - Card #3


This variation is the result of a "happy accident."  I was holding the ovals and fanned them out to look at the colors and decided I liked what I saw.  Another die cut (Accucut), a quick stamped verse (unknown source) and a few green skittles finish off the card.

If you find yourself with nothing but clear skittles, take a little Copic refill ink or your Copic marker and custom color them to match your project.

You still have time to enter the challenge for Sketch #2.  Click here to get all the details.

September 26, 2009

Sketch 2 - Card #2


A printed card front, a quick die cut border, a few ovals from coordinating cards, finished off with a silk flower and matching button and you have the second card made using Sketch #2.

Today is another busy day for me - teaching a Copic class featuring fall images in the morning and then helping my "sis" with a Cuttlebug class in the afternoon.

Check out yesterday's post if you're interested in participating in the challenge for Sketch #2.

September 25, 2009

Sketch 2 - Card #1


Time to move on to the next sketch.  This sketch uses layered ovals with an image in the middle.  Its also time for the Sketch 2 challenge.


The rules are the same as for Sketch 1, which I've repeated below:

  • The challenge is open to everyone
  • Cards are to be based on the original sketch (if you didn't take the class, you'll have to figure it out on your own!)
  • The winning card will be selected based on overall appearance and creative interpretation of the sketch
  • You can post your challenge card beginning on the day the first card is posted; each challenge will end at 5 p.m. (ET) on the day following the posting of the last card (I'll note it in that day's posting) - approximately 10 days per card
  • You can enter all six sketch challenges but you will be limited to one card per sketch challenge
  • Use the "Mister Linky" link at the end of this posting to add your card or, if you're having trouble with the link, simply email your entry to craftjunkies@gmail.com


September 24, 2009

Sketch 1 - Day #10


It's here!  The last of the card designs (#10) from Sketch 1.  I used a sheet of patterned paper and positioned 2 rectangles of card stock on top to mimic the look of patchwork.  I also embossed the corners for an extra touch.  The verse is stamped on colored card stock and positioned directly on the card, no matting this time!

Remember to upload your challenge entry by 5p ET tomorrow - click here for the link and information.  If you are having trouble posting your entry, you can simply email it to me at craftjunkies@gmail.com.

On Friday, I will announce the winner of the Sketch 1 challenge, begin posting the card designs from Sketch 2 and open another challenge so be sure to check back.

September 23, 2009

Sketch 1 - Day #9


I know this looks like a repeat of Day 7 and it is very close.  I only changed the ink colors and the mat color.  Apparently, by this point in the process, I was beginning to lose my creativity!  Oh well, it happens to the best of us.

Don't forget that tomorrow is Day 10 and that you will only have until Friday to enter your card in the challenge drawing!  Click here to get more info.

September 22, 2009

Sketch 1 - Day #8


Another day, another version of Sketch #1.  This one is similar to Day 6 in that it uses patterned paper as the background.  I inked the verse stamp with Marvy brush markers so that I could make the paint brush and palette a different color.  I also used a corner punch from EK Success to coordinate with the paisley design in the paper.

Check out this post for all the challenge details.

September 21, 2009

Sketch 1 - Day #7


 I'm teaching the Monday-version of my "Cheaper by the Dozen" class this morning so this is going to be a very quick post.

Version 7 is another example of using a card with a pre-printed front.  Don't forget to upload your challenge entry.  All the details and the link can be found in this post.


September 20, 2009

Sketch 1 - Day #6

To mix things up a bit but still keep it simple, I used two different patterned papers to create the background for this card.  Use a coordinating card stock for the mat, stamp the verse and you're done!

There are only four more card samples for this sketch.  This means you have until Friday to enter your card in the challenge for Sketch 1.  This post has all the pertinent information.

Happy stamping!

Sketch 1 - Day #5


Well, so much for scheduling a post!  I had prepared my day 5 post and scheduled it to automatically post on the blog yesterday but it didn't work.  So, today you will get two for one.  First, day 5.  Using an A2 card with a pre-printed front helped make this a super simple, super quick card.  Stamp and mat the verse, add a heart punched out of red shimmer paper and you're done!

Don't forget to add your challenge entry for Sketch 1 - go to this post for all the contest details and the link for adding your card.

September 18, 2009

Sketch 1 - Card #4

I'm thinking about renaming this segment of my blog to "a new card idea a day keeps the creative blockers away" - what do you think?

I remember when I was working on all of the cards for the "Cards With Versatility" class.  Having to come up with so many ideas in such a short amount of time really did push me to my creative limits - and, yes, I did take a few prisoners with me!  My friends Kelly and Peggy traveled with me on the journey.  At various points along the way, each of them commented about how much I was testing their creativity.  Oddly enough, they said they not only enjoyed it but thanked me for including them.  Who would have thought I would be thanked for challenging (some may say torturing) my friends???

If your creativity is currently blocked, check out this post for all the key to unlock it (aka "the challenge details").  I hope you join in the fun today!

September 17, 2009

Sketch 1 - Card #3


This is another card from Sketch #1.  If you are interested in participating in the challenge, go to this post for more information and the link to upload your card. 

I used the same stamp for all of the Sketch 1 cards - it is from Verses Rubber Stamps.

While you are working on your card submission for the challenge, I'm off to the studio to finish several designs for my upcoming Copic and Cheaper by the Dozen classes - check out the schedule to the right for more information.

Happy crafting!

September 16, 2009

Sketch 1 - Card #2


It is Day 2 of the Sketch 1 cards and challenge. One thing you will notice is that there isn't a lot of variance in the card designs from Sketch 1. This was intentional and part of the teachings from the class. If you stick around for each day's posting, you will see that the creativity grows with each sketch and each card.


If you are interested in participating in the challenge, please see this post for the details and the link to upload your challenge entry.


The verse stamp is from Verses Rubber Stamps.


Good luck with your challenge entry!

September 15, 2009

Cards with Versatility - Card Samples and a Challenge!


At long last, today is Day 1 of the posting process for the cards from my Stampaway class. For those of you who attended the class, I'll identify the sketch number with each posting so you can link it to your class handout and card kit. If you have any questions about the cards, you can email at craftjunkies@gmail.com.

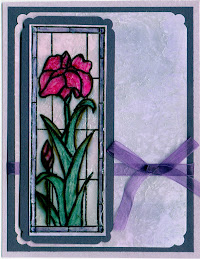
The stamp used in this card, based on Sketch #1, is from Verses Rubber Stamps.

I've also decided to issue a challenge based on the class concept:
  • The challenge is open to everyone
  • Cards are to be based on the original sketch (if you didn't take the class, you'll have to figure it out on your own!)
  • The winning card will be selected based on overall appearance and creative interpretation of the sketch
  • You can post your challenge card beginning on the day the first card is posted; each challenge will end at 5 p.m. (ET) on the day following the posting of the last card (I'll note it in that day's posting) - approximately 10 days per card
  • You can enter all six sketch challenges but you will be limited to one card per sketch challenge
  • Use the "Mister Linky" link at the end of this posting to add your card
The winner of each challenge will receive a card sketch kit, which will include a new card sketch and the materials to make at least 4 cards from each sketch.

A grand prize winner will be chosen from all sketch entries. The grand prize winner will receive all 6 card sketch kits!

Ready, set, go!

September 4, 2009

Labor Day BBQ


I was thinking about the upcoming holiday weekend and it reminded me of this card I did awhile back. It's perfect for that "end of summer" picnic. I actually made the card as a thank you note for the hostess of a luncheon I attended recently. The inside verse reads "My condiments to the chef!".

The chef and the verse stamps are from Inky Antics. I colored the image with my favorite pencil technique - Prismacolor pencils and Gamsol.

Have a safe and relaxing Labor Day and don't forget to send a thank you to your hostess/host if you attend any picnics or barbecues this weekend.